Salesforce OAuth 2.0 Client Credentials Flow with AWS Cognito
Introduction
Implementing OAuth 2.0 Client Credentials Flow between Salesforce and AWS Cognito enables secure server-to-server communication without user interaction. This comprehensive guide walks through configuring Salesforce Named Credentials with AWS Cognito’s OAuth 2.0 implementation for automated system integration.
What is OAuth 2.0 Client Credentials Flow?
The OAuth 2.0 Client Credentials Flow
- Applications authenticate using their own credentials (client ID and secret)
- No user authorization is required
- Ideal for backend services, batch jobs, and system integrations
- Tokens are obtained directly from the authorization server
Prerequisites
- AWS account with access to Cognito
- Salesforce org with System Administrator access
- Basic understanding of OAuth2 and REST APIs
- Backend API service (examples shown with Go/Echo framework)
Understanding the OAuth 2.0 Components
In our integration:
- Authorization Server: AWS Cognito (issues tokens)
- Resource Server: Your backend API (validates tokens and serves protected resources)
- Client: Salesforce (requests tokens and calls your API
Step 1: AWS Cognito Configuration
First, navigate to AWS Cognito and create a new User Pool if you don’t have one already. This will serve as your identity provider.
Step 2: Create M2M App Client in Cognito
- Navigate to Applications → App clients
- Click Create app client
- Select Machine-to-machine application
- Configure the app client:
App client name: Salesforce-Integration - After creation, you’ll receive:
Client ID: (e.g., `2719ej7ft6qak1p9iauen2ps89`)
Client Secret: Click "Show client secret" to reveal"
Step 3: Note Your OAuth Endpoints
Your Cognito OAuth 2.0 endpoints will be:
Token Endpoint: https://
Step 4: Verify Your Cognito Configuration
Before configuring Salesforce, test your Cognito setup using cURL to ensure everything is working correctly:
curl -X POST https://<your-domain>.auth.<region>.amazoncognito.com/oauth2/token \
 -H "Content-Type: application/x-www-form-urlencoded" \
 -d "grant_type=client_credentials&client_id=2719ej7ft6qak1p9iauen2ps89&client_secret=<client secret>&scope=default-m2m-resource-server-pc9tin/read"
Expected Response:
{
  "access_token": "eyJraWQiOiI5Z...",
  "expires_in": 3600,
  "token_type": "Bearer"
}
Step 5: Create External Credential in Salesforce
- Navigate to Setup → Security → Named Credentials → External Credentials
- Click New External Credential
- Configure:
Label: AWS Cognito OAuth
Name: AWS_Cognito_OAuth
Authentication Protocol: OAuth 2.0
Authentication Flow Type: Client Credentials with Client Secret Flow
Identity Provider URL: https://your-domain.auth.region.amazoncognito.com/oauth2/token
Scope: your-resource-server/read
Pass client credentials in request body: ✓ (checked)
Step 6: Create Principal in External Credential
- Stay on the External Credential page
- In the Principals section, click New
- Configure:
Client ID: 2719ej7ft6qak1p9iauen2ps89
Sequence Number: 1
Client Secret: your-aws-cognito-app-client-sercret

Step 7: Configure Permission Set for the principal
This is a crucial step that’s often missed:
-
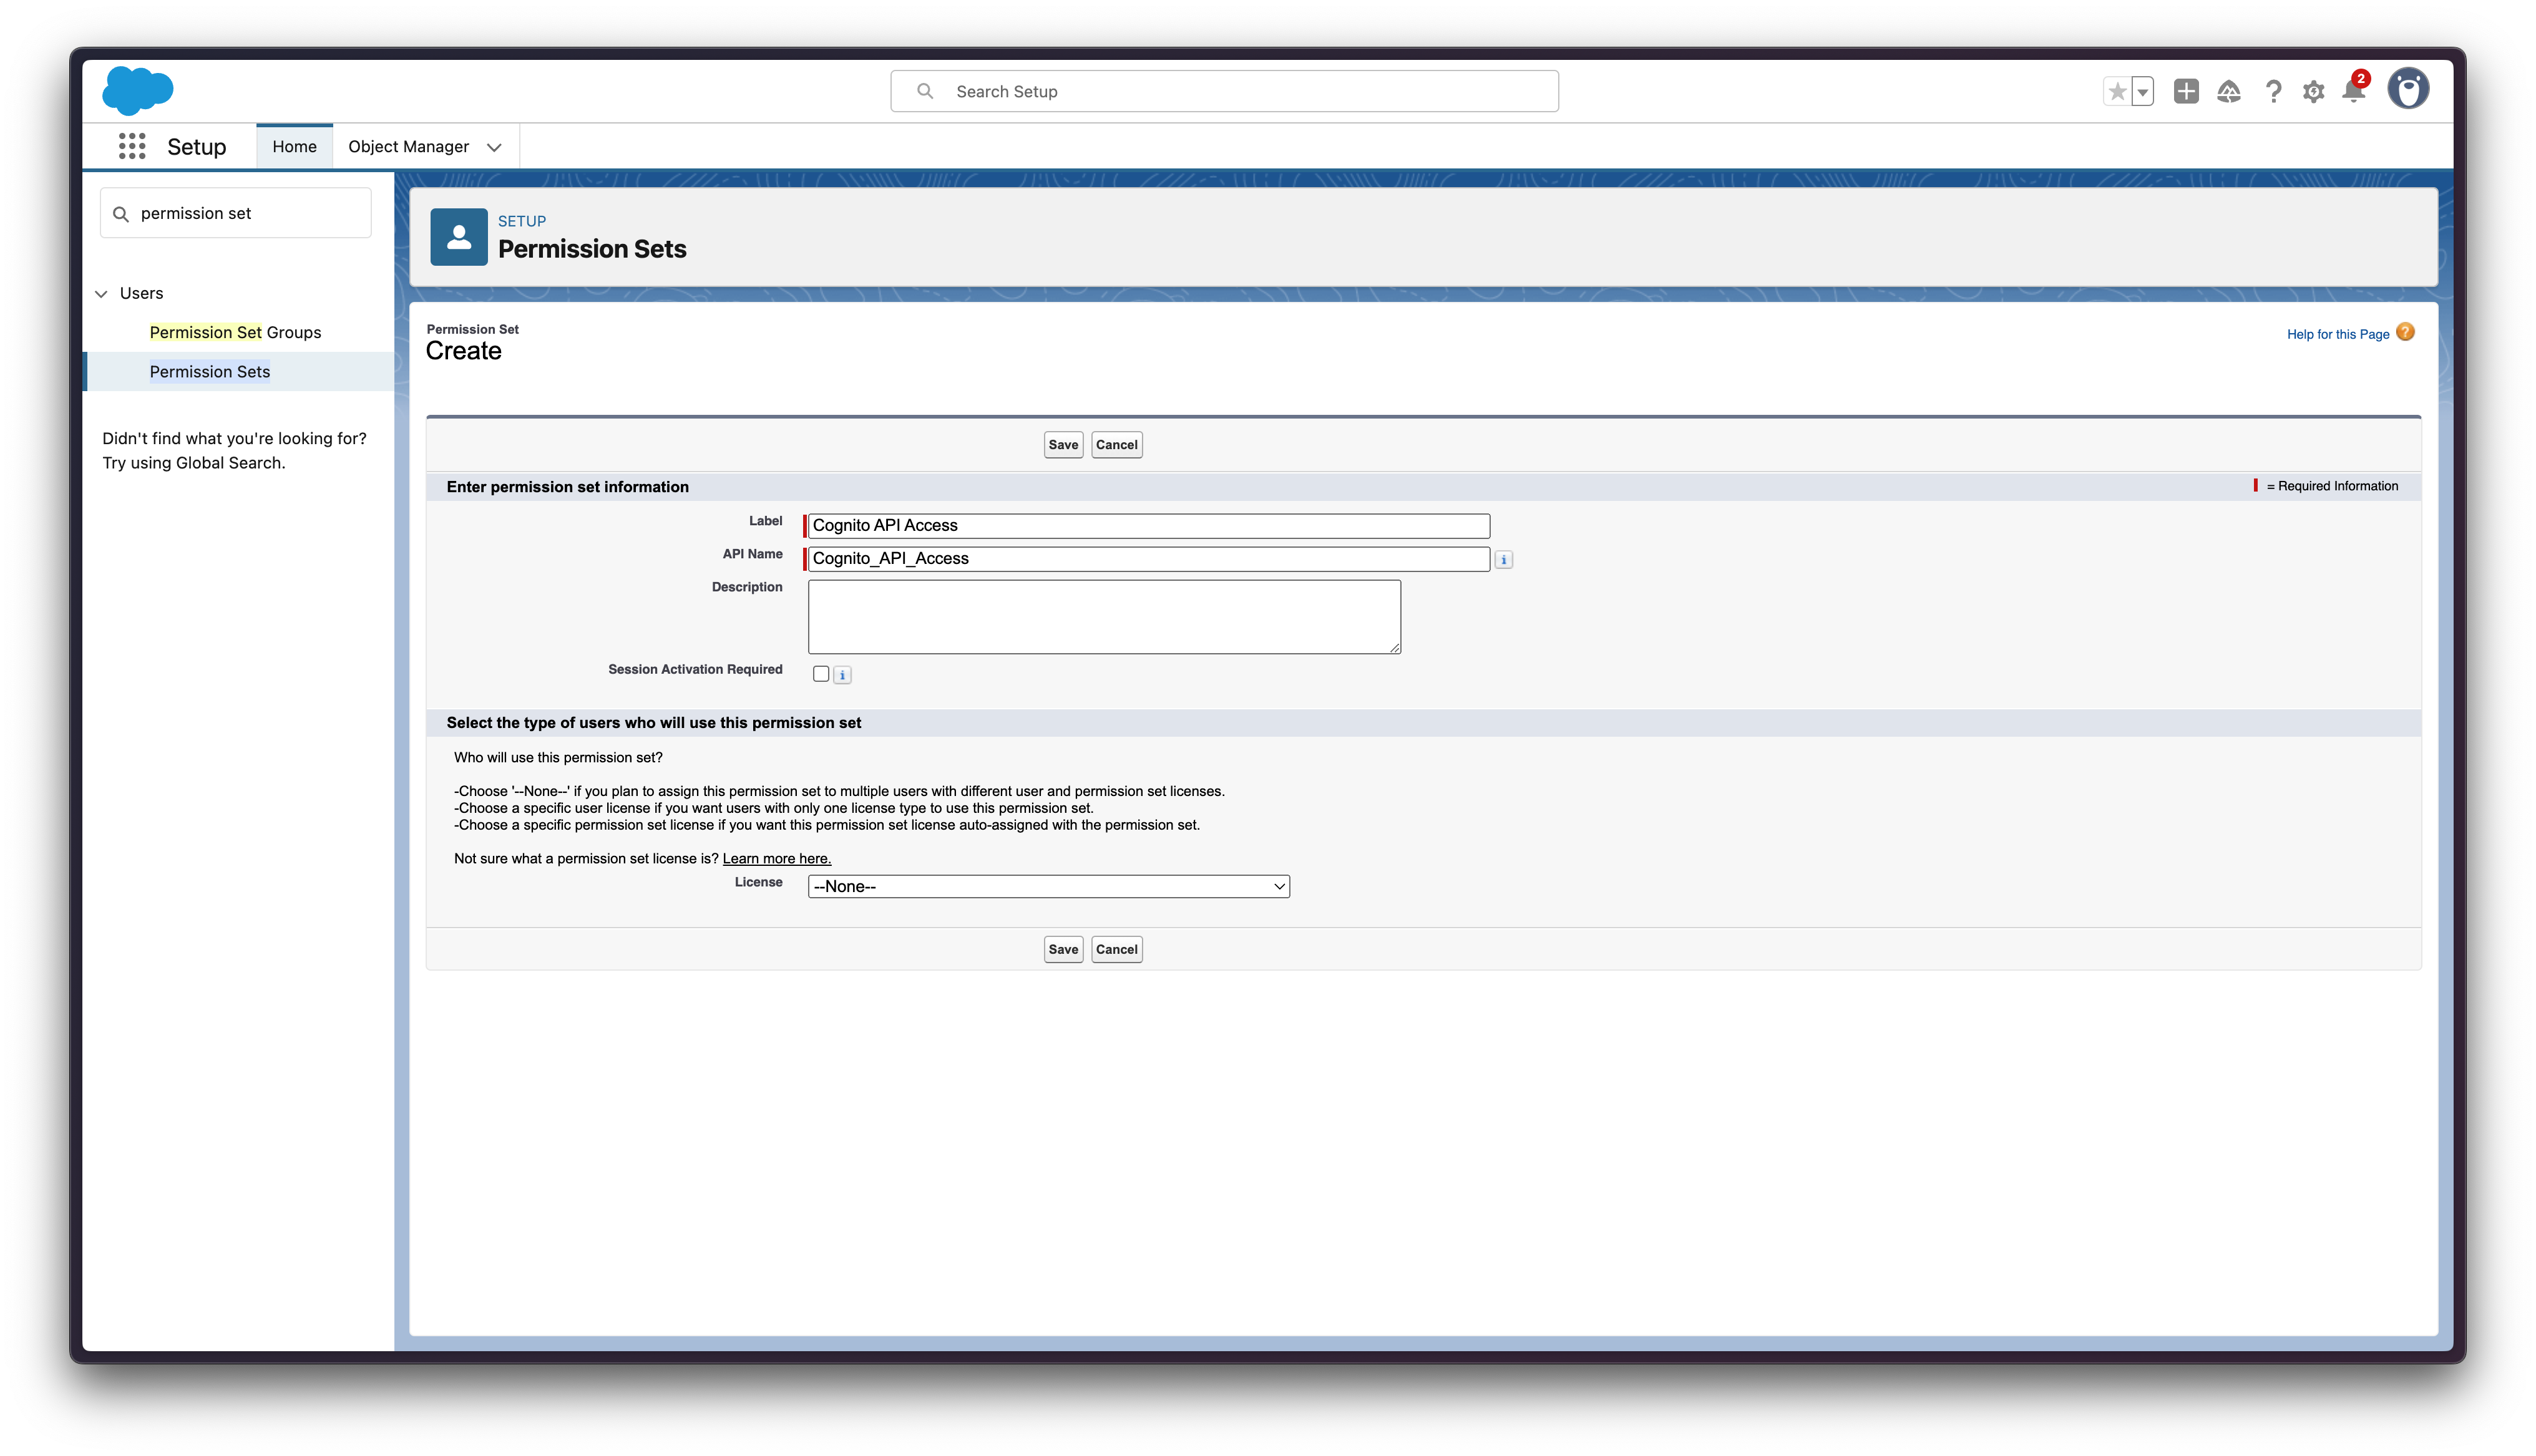
Go to Setup → Users → Permission Sets
-
Create a new Permission Set
-
Configure:
Label: Cognito API Access API Name: Cognito_API_Access -
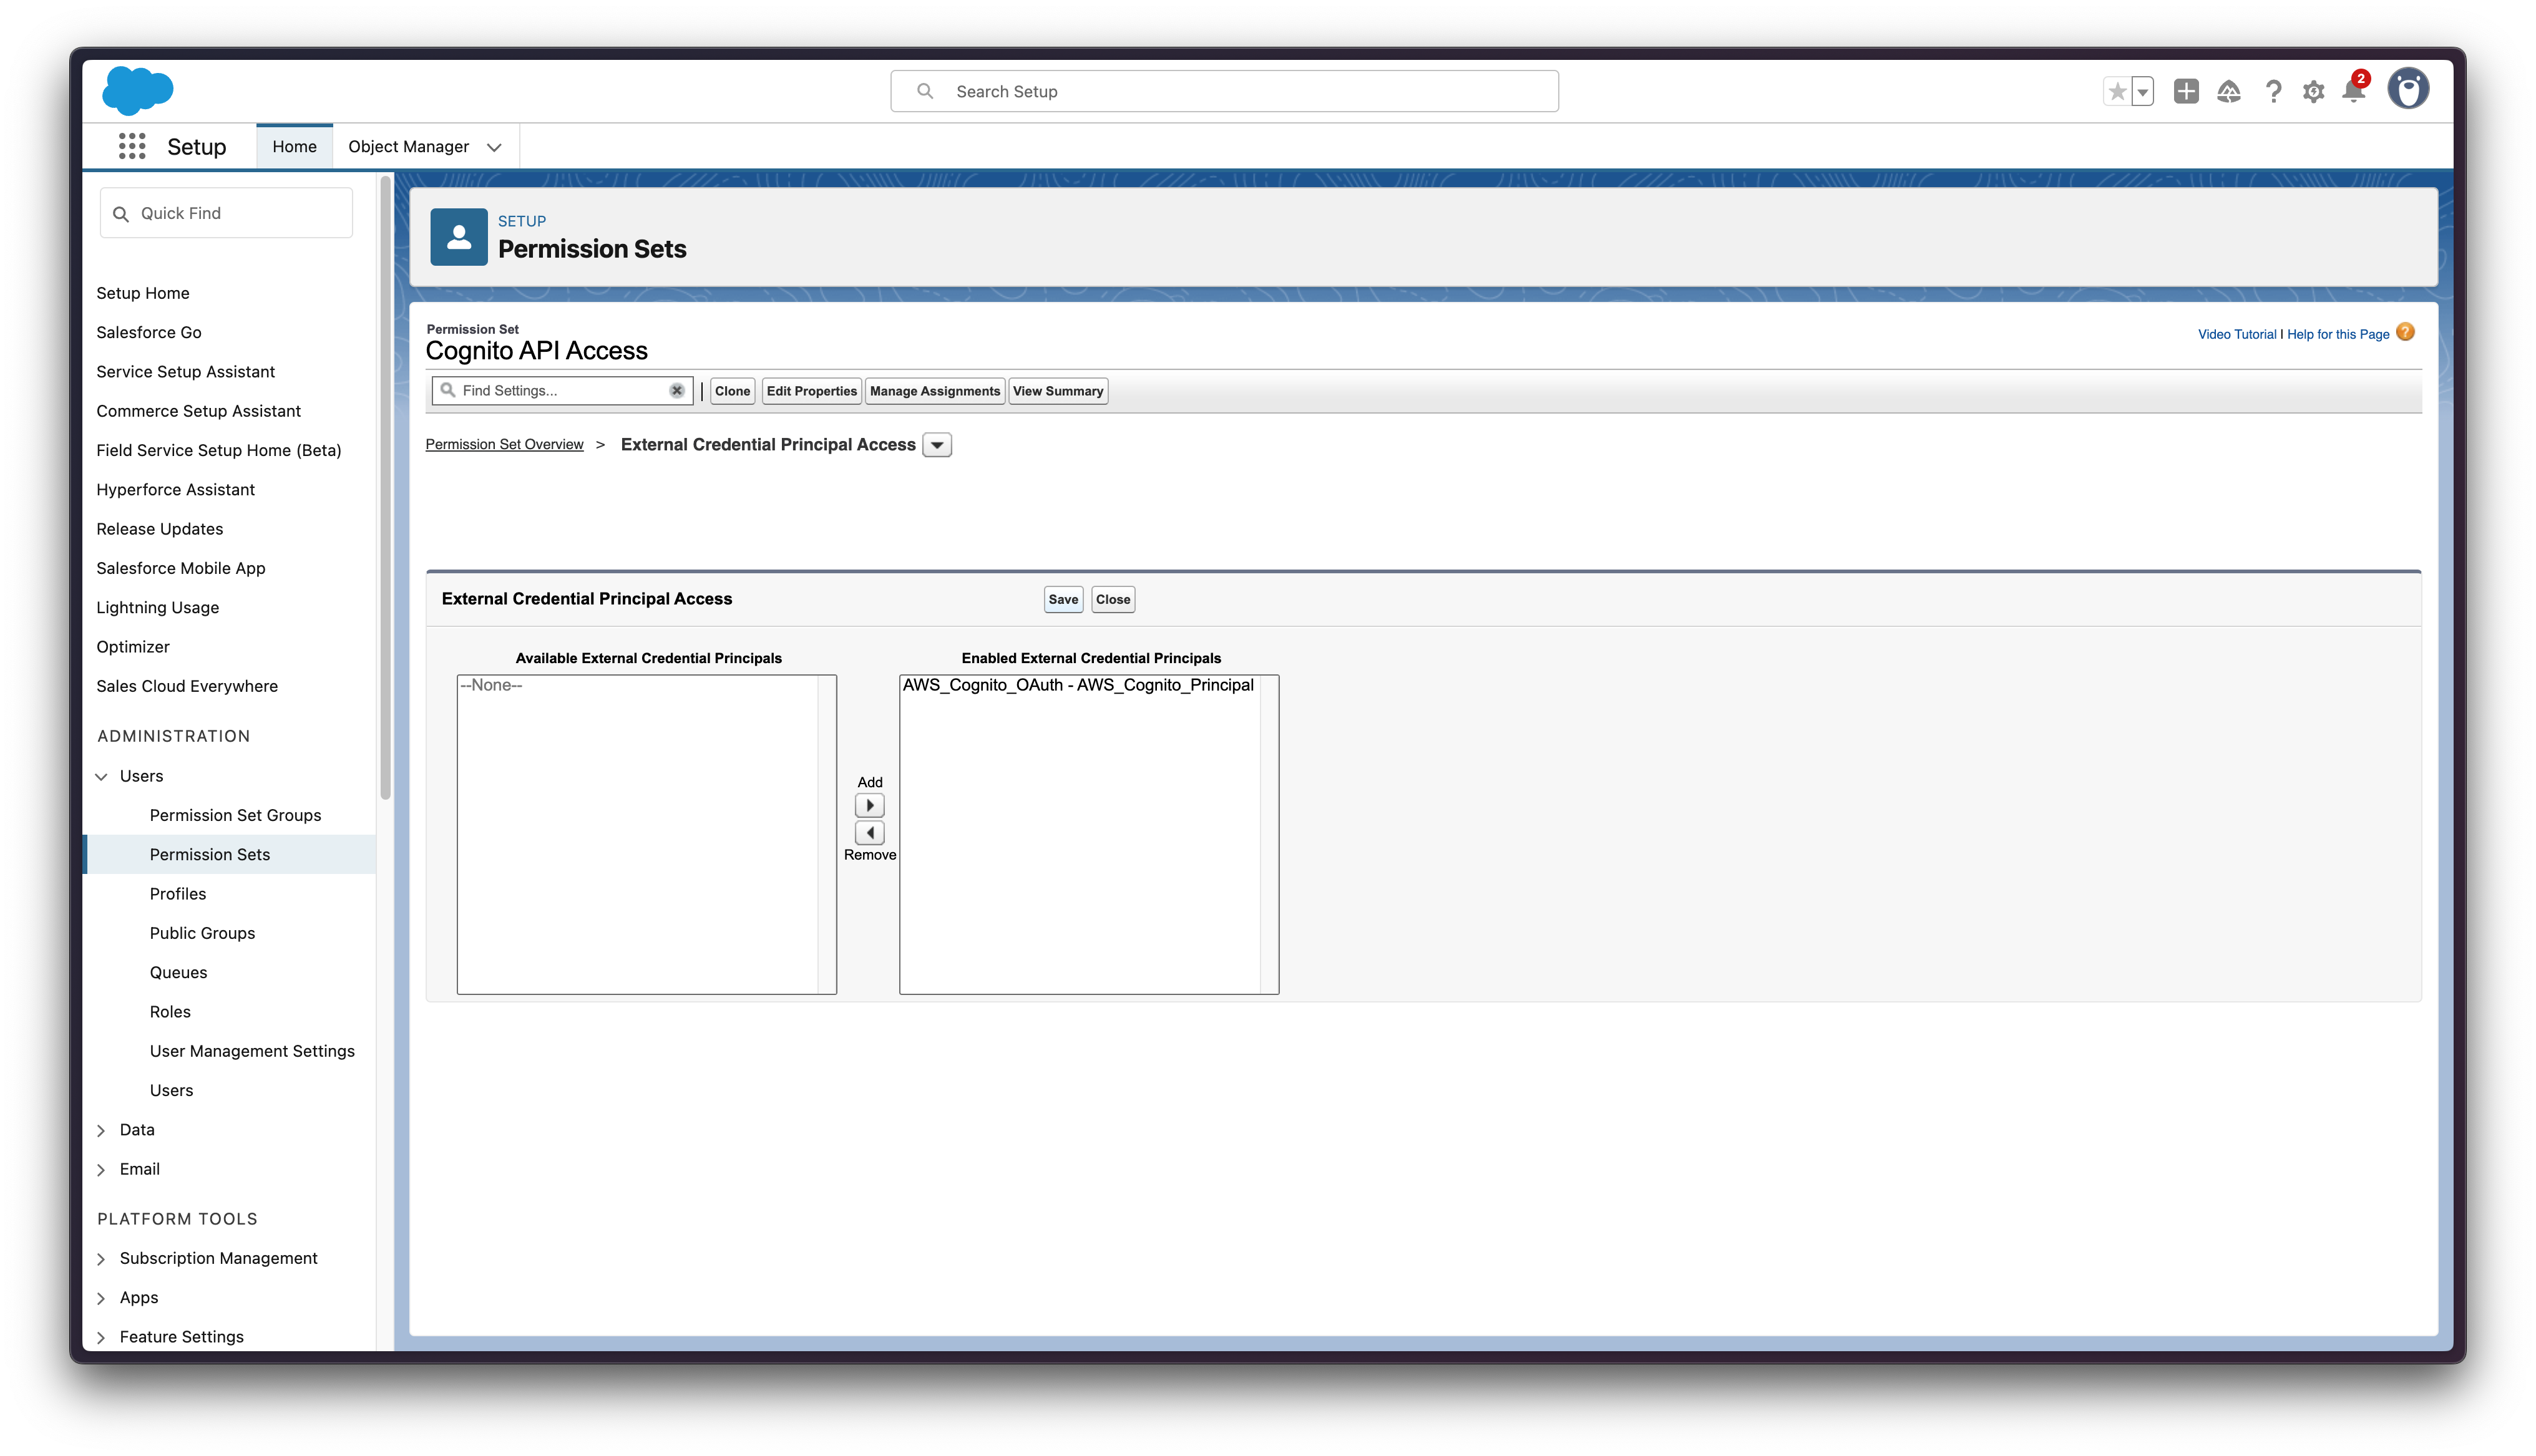
Click External Credential Principal Access and move the external credential principal from the Available to the Enabled column
-
Assign the new permission set to the autoproc user
- Open the permission set you created, and then copy the Id of the permission set from the URL It’s the alphanumeric string starting with OPS
- Open the Developer Console
- To open the Enter Apex Code window, click Debug | Open Execute Anonymous Window
- Paste the code and add the OPS string of the permission set ID
insert new PermissionSetAssignment( AssigneeId = [SELECT Id FROM User WHERE alias = 'autoproc'].Id, PermissionSetId = '<OPS string>' );- Click Execute The autoproc user is assigned the permission set that you created
-
Assign the new permission set to the users who perform contract extraction
- Select the permission set you created
- Click Manage Assignments and then Add Assignments
- Select the checkboxes next to the names of the users you want to assign the permission set, and then click Next
- Click Assign
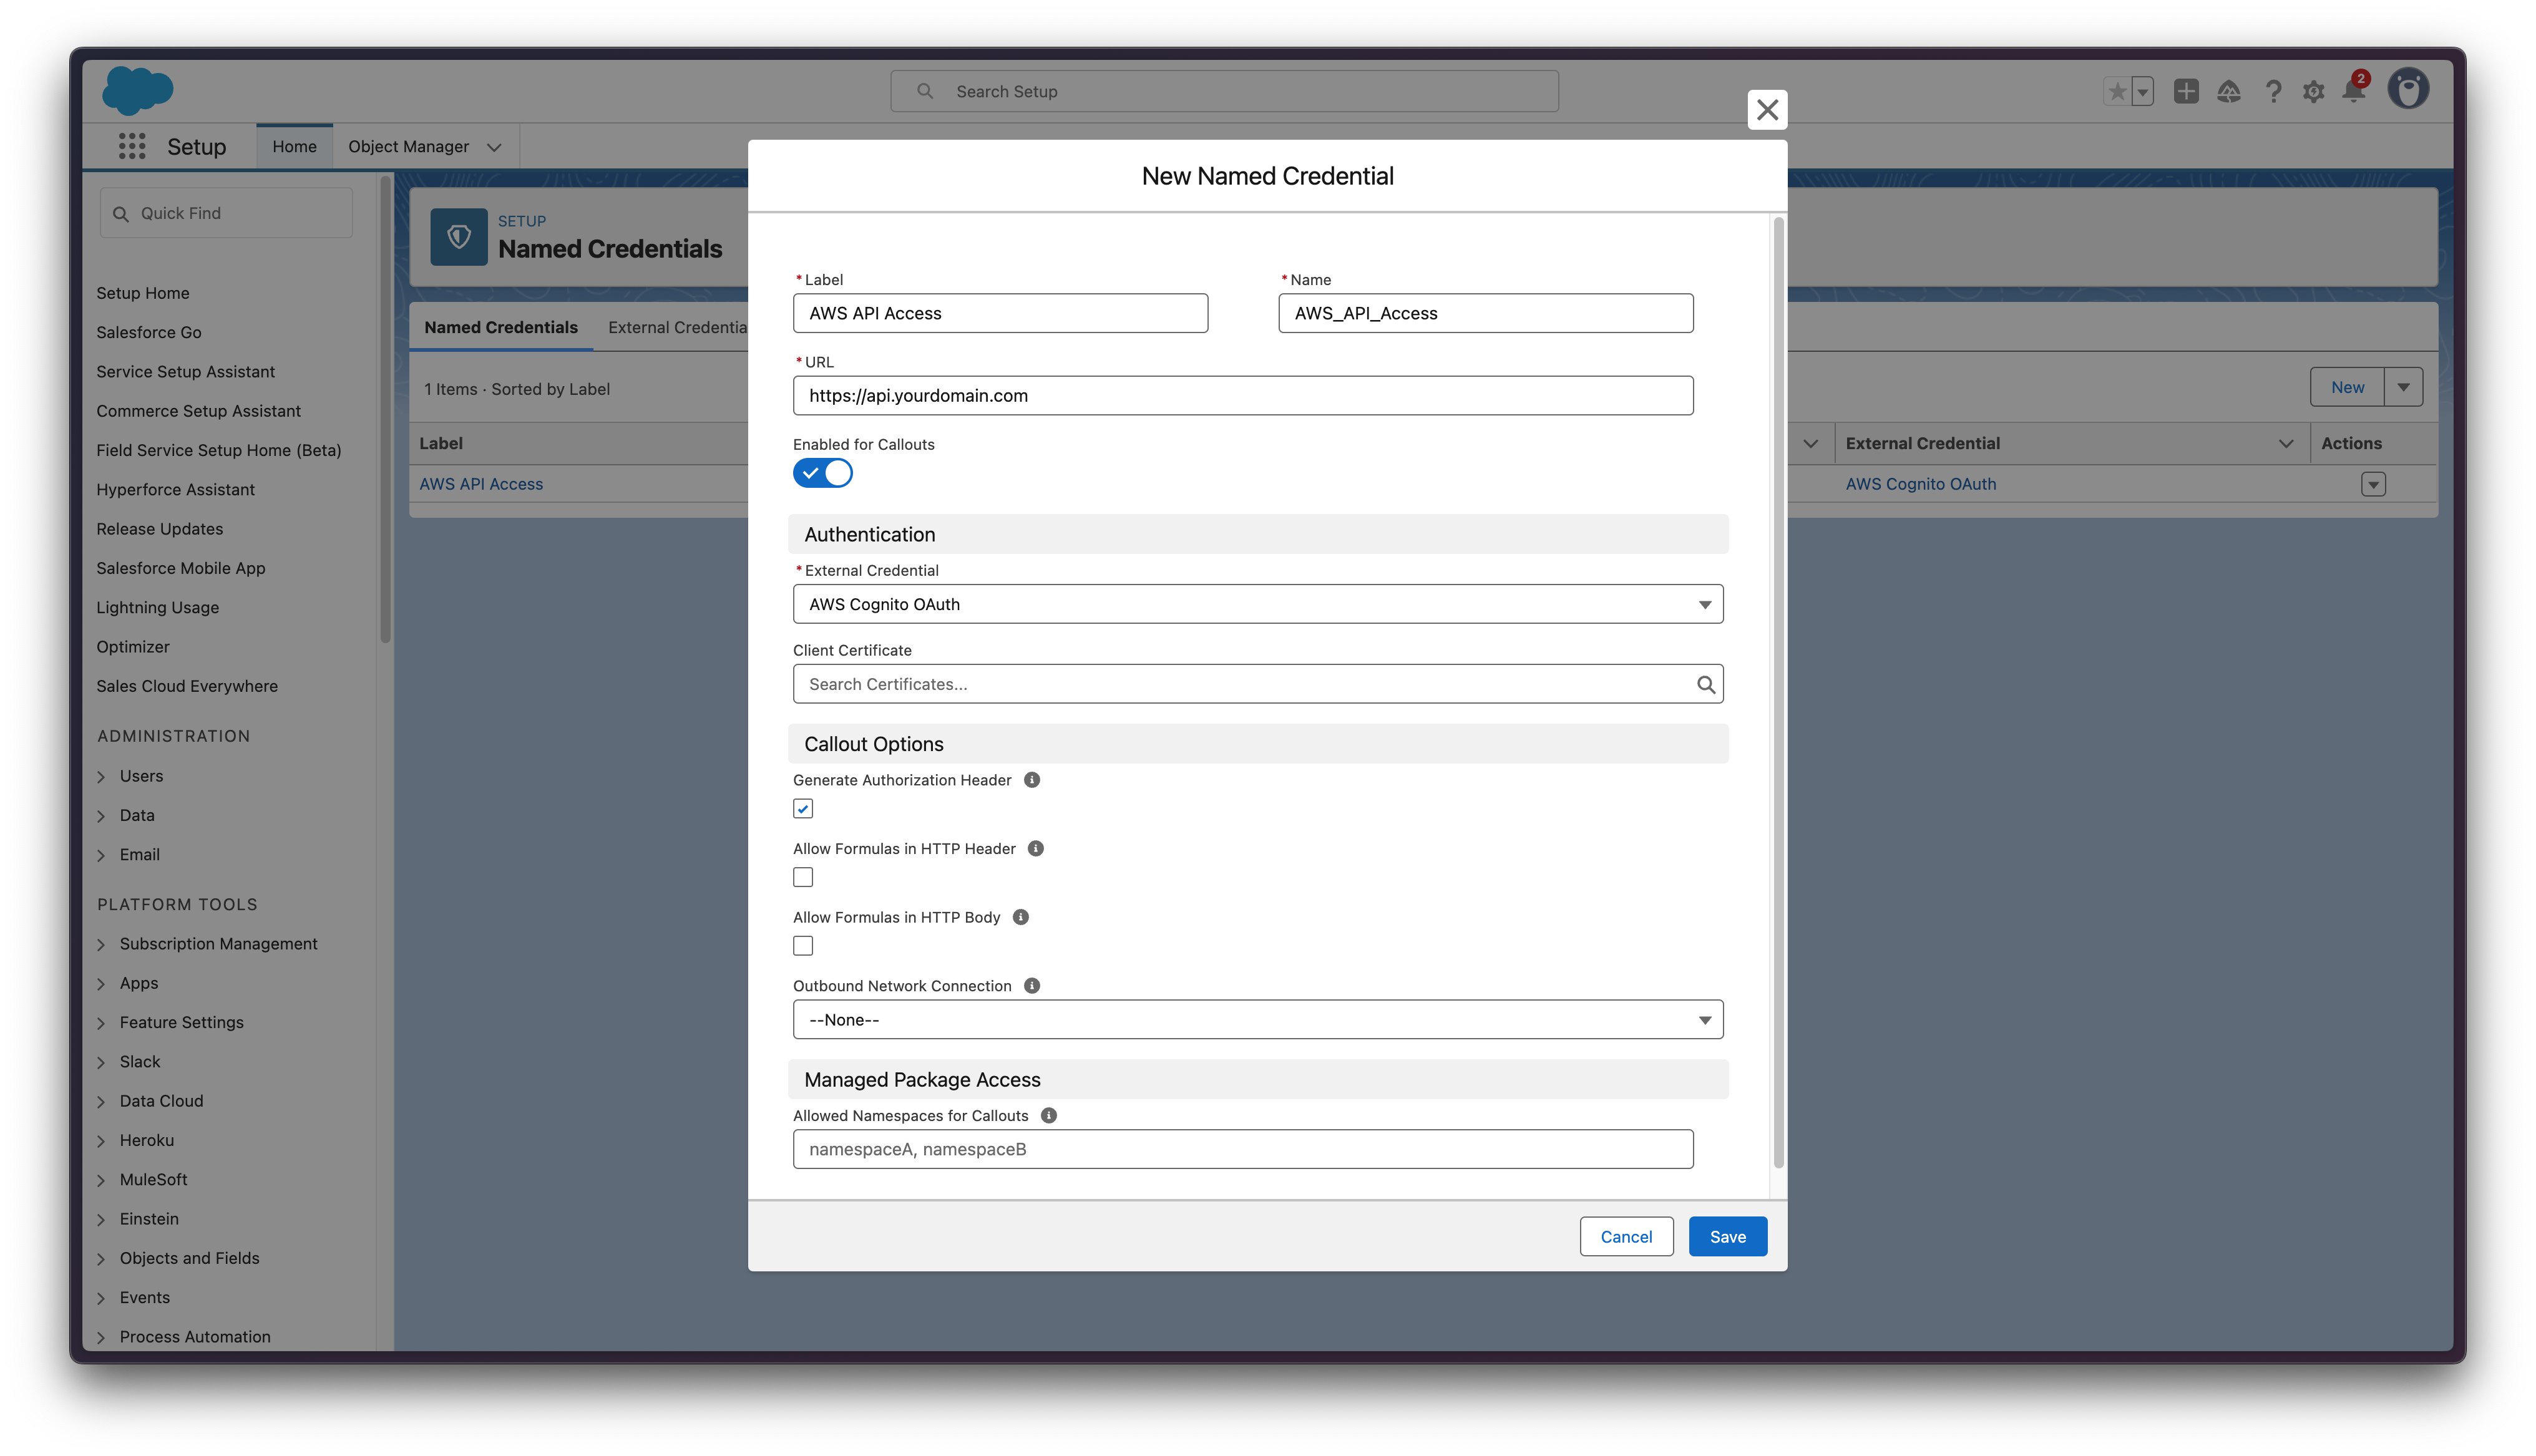
Step 8: Create Named Credential
- Navigate to Setup → Security → Named Credentials → Named Credentials
- Click New Named Credential
- Configure:
Label: AWS API Access
Name: AWS_API_Access
URL: https://api.yourdomain.com (your actual API endpoint)
External Credential: AWS_Cognito_OAuth
Generate Authorization Header: ✓ (checked)
Enabled for Callouts: ✓ (checked)
Step 9: Testing the Integration using Apex
Open the Developer Console to click Debug | Open Execute Anonymous Window to test your configuration:
// Test OAuth2 integration
HttpRequest req = new HttpRequest();
req.setEndpoint('callout:AWS_API_Access/test');
req.setMethod('GET');
req.setHeader('Content-Type', 'application/json');

Http http = new Http();
try {
    HttpResponse res = http.send(req);
    System.debug('Status Code: ' + res.getStatusCode());
    System.debug('Response Body: ' + res.getBody());
} catch(Exception e) {
    System.debug('ERROR: ' + e.getMessage());
}
Verify OAuth Token in Your Backend
To confirm that Salesforce is correctly sending the OAuth token to your backend, add a middleware to dump headers. Here’s an example using Go with Echo framework:
// Middleware to dump request headers
func HeaderDumpMiddleware() echo.MiddlewareFunc {
   return func(next echo.HandlerFunc) echo.HandlerFunc {
       return func(c echo.Context) error {
           fmt.Printf("\n[%s] %s\n", c.Request().Method, c.Request().URL.Path)
           fmt.Println("Headers:")

           for key, values := range c.Request().Header {
               fmt.Printf("  %s: %s\n", key, values[0])
           }

           // Extract Bearer token if present
           if auth := c.Request().Header.Get("Authorization"); auth != "" && strings.HasPrefix(auth, "Bearer ") {
               token := auth[7:]
               fmt.Printf("\nToken: %s\n", token)
           }

           return next(c)
       }
   }
}

// Usage
func main() {
   e := echo.New()
   e.Use(HeaderDumpMiddleware())

   e.POST("/test", func(c echo.Context) error {
       return c.JSON(200, map[string]interface{}{
           "success": true,
       })
   })

   e.Start(":8080")
}
Copy the token from the logs and paste it into https://jwt.io to decode and verify the payload contains your client_id and scopes.
Conclusion
Setting up OAuth2 authentication between Salesforce and AWS Cognito requires careful configuration of multiple components. The key points to remember are:
- Use M2M App Client in Cognito for server-to-server authentication
- Configure External Credentials with Client Credentials flow
- Don’t forget the Permission Set configuration - it’s often the missing piece
- Test thoroughly using Apex code and backend logging
With this setup, your Salesforce org can securely communicate with your backend APIs using industry-standard OAuth2 authentication, with tokens automatically managed by Salesforce’s Named Credentials framework.